Covering Pens with Polymer Clay, Page 2
<------Pens, Page 1![]() Pens, Page 3 ----->
Pens, Page 3 ----->
Main
![]()
![]() Great Starts
Great Starts ![]()
![]() Links
Links
![]()
![]() Gallery
Gallery
Using cane slices is a little trickier, but lots of fun!
|
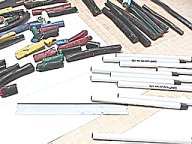
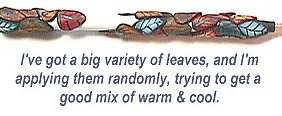
I love making leaf and flower pens... I've assembled a big variety of canes, here, and all the tools I'll need: pens, skewers, tissue blade, sheets of clean paper and a baking rack. I'm trying to slice the cane evenly, and since the leaf canes are mostly from metallic clays, I'm slicing them on a diagonal, to catch more light from the way the mica aligns. | 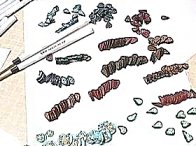
|

|
Some of my canes are old, and prone to cracking like this when they're flexed. Just warm them a little and they'll press smoothly around the pen with some coaxing. | 
|
|
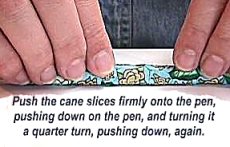
Press cane slices all over the pen, warming them in
your fingers and trying to avoid big gaps like this one, that could be difficult to work out. You want each slice to stick fairly well before you ever begin to roll the pen... if part of it is loose, as soon as you start to roll the pen, it will turn into a big floppy blanket. *g* Get the parts adhered well, and then gently begin to roll it on the table... if you feel the clay shift around, stop and make sure that it's still stuck on the pen, then continue. Moving slowly right about now will help you avoid air bubbles but if you do get one, they're pretty simple to eliminate. Just slice into it from the side, ease the air out toward the cut, then reseal the clay. |


| The simplest canes can make really interesting surfaces. Try putting very thin slices of a plain jellyroll of translucent and gold on a dark background. Or a simple blend of metallics that is "distressed" by dragging your needle tool through it before thinning the sheet to the thickness you want to wrap the pen with. On Page 3, we'll do so simple carving and backfilling. | 
|
<----Pens, Page 1![]() Pens, Page 3 ----->
Pens, Page 3 ----->